Thursday, March 21, 2013

Pro Photographer Ambush with the Sigma DP2 Merrill Camera

Scenario:  Hand a Top Pro Model Photographer a DP2 Merrill and get his opinion on the image quality.

John Fisher is one of Miami's Top Photographers and happens to be my neighbor.  He has photographed Presidents at the White House, covered the Olympics and shot for fashion magazines like ELLE.  I like his attitude about the pro photography business.  He said that hot new photographers come in, make a splash in the business with the newest " In" look and they really peak with amazing success then other photographers copying his look and after a while the artistic director decides he can go with photographer XYZ as the, "Look" is no longer " In".  Nothing worse than washing out of the business because you can't change to keep up with current trends or continue to be creative and grow as a photographer.  John knows how it feels to be at top of his game but has been consistent, knowing that its not being on top that is important, it consistently getting the commercial work that makes a great photographer--he doesn't need to be number one--just wants to be the one that gets called for the job. At 66 when most photographers are retiring, John loves what he is doing so much that he's hoping that he gets another five good years in the business and hopes to retire at the top of his game.  John has an amazing eye for color. His technical knowledge is superb, honed from years of experience.  An artistic director can describe to John what he is looking for and John intuitively always delivers. Whether shooting movie stars, Tv personalities or upcoming models or Presidents, he tells me that the key to being a photographer isn't being great   It about being "good"all the time and having the right expectations.

John asked to use my dogs as models in the photo shoot. "Buddy" and " Lucky the Gangster" agreed to do the shoot with the Actress.    During the break, John told me the parameters he wanted set on the DP2M (F4.0 Aperture Priority, Auto White Balance) and I handed him the camera.
He only had a couple minutes to snap some shots. It was ironic that he chose to photograph dogs as there is a joke in the photography world that the first thing photographers always do with a new camera in their hands is to photograph a pet.  Here are my pets below--you might recognize these famous dachshunds . If you click on the images, you should be able to see larger versions.
Raw image processed a the standard color setting
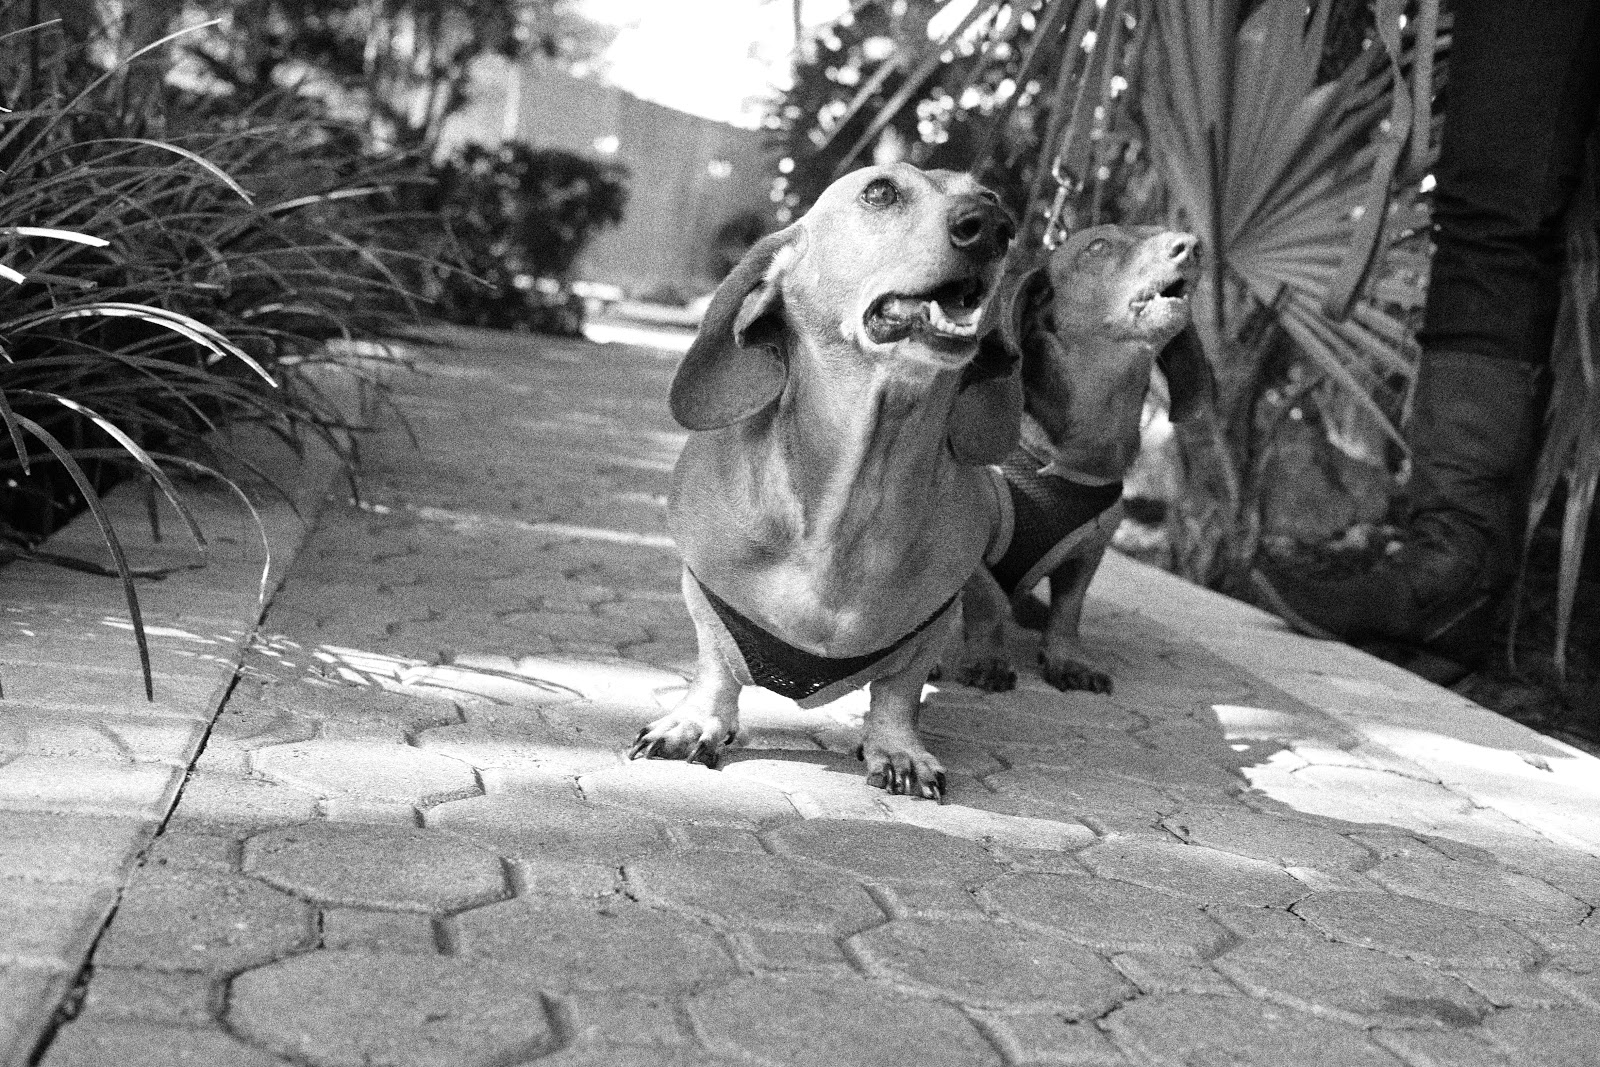
Raw Image processed with the new Monochrome and film simulation--very slight film grain was added for a retro look

Raw image above with a rough film image grain added to simulate black and white film.
Raw image above processed with the Monochrome with very slight film grain for a rich blacks and contrast.


Raw Image with Standard Color setting


Raw Image Above Processed with no film grain added with the monochrome setting in SPP 5.5.
The image above was processed in Sigma Photo Pro Software 5.5 raw in the Neutral colorspace.

The raw image above was processed using the Standard color setting.
Raw Image above processed with the Monochrome setting with film grain added.

 John added an artistic touch to the photos by lying on the ground, shooting at the dog's level and playing with the perspective of the scene, taking advantage of the slightly wide " Normal" 30mm f2.8 lens of the DP2M which is equivalent to about a 45mm lens on a full frame camera. He nailed the moving dogs with the tiny camera. Notice how Lucky the Gangster is having a party, barking, growling for attention and having a good time?  I thought for sure that the shoot with the DP2M was a bust. I was surprised that John got any images in focus--as the dogs never stopped moving. However this is where experience of shooting Olympic sports comes in handy and knowing how to shoot moving objects with a simple camera. You have to remember that many of us " Old Timers" spent years using manual focus cameras to shoot sports, so any autofocus is dramatic step up in accuracy and keeper rates.
Later on I showed him the edited images he was very surprised at the high image quality. I enlarged the images to 100 percent, then to 200 percent and John was amazed.  He had no idea that he was shooting with a camera that can produce an image comparable to one shot with a 30 MP camera. Here is the interview I did with John below.
One of the great things about being surrounded by great photographers like John is that I get to sit down, swap stories and  always learn something, a tip etc.  John said he'd been shooting with Paul C Buff Einstein studio lighting for years  and thinks it is just about the best available as these strobes give consistent color temperature as you dim them, saving having to redo custom white balance every time you increase or dim the strobes. Said these were the best in the business---so I thought that was a very nice tip for someone out there thinking about picking up some studio strobes.  I know when I upgrade my strobes, I'm going with Einstein strobes.
John is looking forward to when I get a DP3M and getting his hands on it and really put it to the test.  I'll keep you posted.
HAPPY SHOOTING!

Friday, March 15, 2013


Looking for a compact flash solution for your Sigma DP Merrill series compact cameras? The Sigma EF-140 DG SA-STTL and the Metz 20 C-2 are my two choices for use on Sigma's DP Merrill cameras and are the only compact flashes that I would trust to put on my Sigma DP2M or any DP Merrill series compact camera.

Sigma EF-140 DG SA-STTL Flash

The most advanced flash is the Sigma EF-140 DG flash which features TTL  which prior to the exposure, the camera tells the flash to fire a pre flash, then the camera measures the exposure and  decides what flash level output is needed to provide the right amount of light. This happens at a fraction of a second before the photo captured. This type of flash system works very well.  Just put the flash on the camera, turn it on, and  set your camera to use the TTL flash as a fill flash or as a regular flash---It is simple, not much thinking involved, etc. It can be used manually as well. The Sigma EF-140 sells for around $89.00 ( USD).

 Sigma EF- 140 DG TTL Flash

I have used Sigma flashes on my Canons and  Sigma DSLRs for years and never had any issues with Sigma's TTL flash technology. It works. The EF 140 DG has a guide number of 14 ( iso100/m) and 16mm focal length illumination coverage. It was designed for the original DP1 which had a wide angle lens.  Takes two AAA batteries and has a recycle time of about 5.5 to 6.5 seconds. It lacks any flash bounce feature. There were some complaints that Sigma didn't put a built in flash on the DP Merrill series.  I disagree. I dislike built in camera flashes. I prefer to have full control over the flash without built in limitations. I  want a compact unit that also enables me to bounce flash which is a desirable missing feature.

I notice that the EF-140 DG flash is no longer mentioned on any Sigma website but can still be purchased from internet retailers.  I don't know the status of this product long term. Is it being refreshed with a new replacement or is being discontinued?  The bottom line is that the EF 140 DG flash was designed for a wide angle camera, so it should work with the DP1M, DP2M and DP3M but lacks a bounce flash feature. No word on this from Sigma yet.  I've put an information request in on the status of the EF 140 DG.  If I get an update from Sigma--I'll share that with you.

The Metz 20 C-2

So if you want a compact flash with the bounce feature, would you brave using an old school Automatic flash?  Enter the Metz 20 C-2 compact manual ( AUTO) flash. It retails around $49.00 USD. 
Metz 20 C-2 mounted on the hotshoe of a DP2M with Richard Franiec's custom camera grip attached.

The Metz flash uses  older "auto" flash technology with the sensor located on the front of the flash. It doesn't use advanced TTL ( through the lens)  metering technology where the camera communicates with the flash.  It has a guide number of 20 at iso 100/m 21 degree coverage ( 35mm focal length)  You have two automatic apertures to choose from if you want to use the flash automatically--F 2.8 (green) and f5.6 (red) on the back switch.  
 Here is how it works.  Attach it to your camera.  Any camera that can trigger a flash with its hot shoe will work with this unit.  Any camera that has an X socket can use a cable to attach to the flash's own sync socket as well.  The Flash foot has a locking switch that attaches it firmly to the camera hot shoe.
Notice the locking mechanism on the base of the flash foot. Much better than a tightning wheel in my opinion. This securely attaches the flash to the DP2M or any standard camera hot shoe.
Set your camera on manual exposure. Set your camera at the base flash shutter speed at 1/125th of a second or 1/200th --whatever flash sync setting your camera uses (Remembering that this flash can be used on any camera).  Set your camera ISO at 100. Put your aperture ( lens opening) at either f2.8 or f5.6. Remember if you select f2.8, then you need to put the switch on the back of the camera to f2.8 ( Green). If you use f5.6, then put the switch on the f5.6  setting(Red)  The rest is simple.  Point the camera and shoot. The sensor meters the light and the duration of the flash is set for proper exposure.  Be careful not to block the sensor with a large lens hood. The flash does not get its information from the camera or communicate with the camera.  It is assuming that you set the camera on its native flash sync, set the F stop at f2.8 or f5.6 and the iso at 100.  There is a contact on the bottom of camera's hot shoe  that triggers the flash.  A synchronizing cable can be used with a camera's X socket ( if it has one) and Metz's own sync socket.  The DP Merrill series cameras don't have an X socket.  I wanted to include this information for those that might purchase this unit for other compact camera with standard flash mount or  X sockets.
The newest firmware update of the DP Merrill compacts allows flash sync speeds at 1/125th sec. I've tested flash sync speeds at 1/125 and 1/200th sec.  Both speeds work with the DP2M.   The flash also offers full manual control using the chart on the back of the flash. 
There is a nice camera calculator on the back of the Metz 20 C-2. Notice the Off, M-Manual, f2.8 ( Green) and the f5.6 (Red) switch positions. If you want to shoot at higher ISOs and use the flash manually, just set it on the M setting and follow the lines on the chart which will tell you based on how far away you are from the subject you are shooting, what the Iso and f-stop should be asssuming that you are using a standard camera sync speed which universally is usually 1/200th a sec. There is also an LED that turns green when the flash is ready and it also can be used to manually flash the camera.  The LED on the right side will flash red indicating correct exposure of the scene.  If it doesn't flash--you have under exposed the scene.
 For novices, these new terms may be confusing --ISO, F-stop, shutter speed etc. 
So here is a quick primer:
ISO--this is the setting that makes the sensor more or less sensitive to light. This term is a carry over from the days of using film.  You would buy Iso 100 film for shooting during the day and iso 400 or higher for shooting indoors or low light.
F-stop- This is simply the size of the opening of the camera lens aperture. This is controlled by little blades that you will see change the size of the iris in the lens by letting in more light or less. The smaller the number--the more light enters the lens( Example-f2.8). The larger the number , the smaller the iris which means less light reaches the sensor( Example -F5.6)
Shutter speed--This is the speed that the shutter opens and closes.  Most flash sync settings are 1/125th of a second to 1/200th of a second.

The Metz 20 C-2 has a LED on the right backside of the unit that briefly flashes red  to confirm the correct exposure.
Using the Metz flash is very simple but using the light bouncing feature can produce underexposure if not used in the right situation.  You will get underexposed photos if you don't have anything overhead to bounce the light off of.  In a house with an 8 foot high white ceiling--there should be no problem shooting with the bounce flash option, but you may have to increase your ISO setting from 100 to 125 or 200 respectively--or change your shutter speed from 1/200th to 1/125th as well.

The pop up bounce flash feature demonstrated on the DP2M. It tilts 30, 45, 60, or 90 degrees!

You can always use the chart on the back of the flash and shoot manually.  Pick the ISO you want to use, the distance away from the subject and the chart will tell you what the F stop should be used. Expect to fiddle with the controls and experiment if you are going to be bouncing the flash. It can be tilted to 30- 45- 60 or 90 degrees. The flash duration is between 1/1200 to 1/25000 of a second with a color temperature of 5500K.  It is designed  to be used at iso 25  to 400. The written manual has formulas that you can used  for more advanced features like fill lighting etc. Note: Read the manual. 

 The nice thing about the Metz is it's simplicity with its two Auto flash Fstop settings of F2.8 and F5.6.  The addition of having the ability to bounce the light and the low cost for this pocketable flash make it a good option for use with your DP Merrill compact series cameras or any camera for that matter.  If you need  through the lens TTL flash,  the only unit available is the Sigma EF-140 DG  with a slightly higher price tag minus the bounce feature.  You can still put a full size Sigma EF 610 Standard or DG super Flash on a DP Merrill series compact camera.  Some of the other manufacturers make smaller TTL flashes for their respective brands, so you might have a compact solution if you are using another brand.
Do I recommend the Sigma EF-140 DG over the Metz 20 C-2 ?  No--that depends on your needs. If you don't need to bounce  flash and want a small pocketable TTL unit, then the Sigma EF-140 DG will suit your needs.  If you need to bounce flash, the Metz 20 C-2 is a better choice.  The  downside with the Metz flash is that it can take up to 8 seconds to recycle the flash depending on what battery type you use and there is a stern warning against ever using Lithium AA batteries with this flash. Metz states that the flash must be turned on for 10 minutes ever 3 months to prevent the capacitor from degrading.
I should mention there are more powerful manual flashes available from Metz and Vivitar.  Both cost around $89  USD if you want to go the auto sensor on the flash route instead of the Sigma TTL options. Full size flashes  look mammoth on DP Merrill cameras (DP1M, DP2M , DP3M).   Pick what will work best for you. The Sigma EF-140 DG is the simpler more sophisticated solution  while the Metz requires more user input but offers the tilt reflector. Of course, you could own both. 
 Finally--the obligatory first pet photos!
Auto Mode ( RED) F5.6, iso 100 at 1/160th secAuto Mode ( Green) f2.8, iso 100 at 1/160th sec
Buddy agreed to model for me on short notice. I accidentally knocked the shutter sync speed from 1/200th to 1/160th or a second--Whoops!--but the Metz flash was very forgiving.
 
HAPPY SHOOTING!
 

Thursday, March 14, 2013

Sigma DP1M,DP2M,DP3M flash options- the Metz 20 C-2 or the Sigma EF-140 shoe mount flash?

There are currently two flashes that are small and fit on top of the Sigma DP Merrill Series compact cameras, the DP1M, DP2M and DP3M that I would trust. The most advanced flash is the Sigma EF-140 DG flash which features TTL  which prior to the exposure, the camera tells the flash to fire a pre flash, then the camera measures the exposure and  decides what flash level output is needed to provide the right amount of light. This happens at a fraction of a second before photo is shot. This type of flash system really works very well.  Just put the flash on the camera, turn it on and you can set your camera to use the TTL flash as fill flash or as a regular flash---It is simple, not much thinking is involved etc. It can be used manually as well. The Sigma EF-140 sell for around $89.00 ( USD).

I have used Sigma flashes on my Canons and  Sigma DSLRs for years and have never had any issues with Sigma's TTL flash technology. It works. The EF 140 DG has a guide number of 46' (14.02 m) at ISO 100 and 16mm focal length illumination coverage as it was designed for the original DP1 which had a wide angle lens.  Takes two AAA batteries and has a recycle time about 5.5 to 6.5 seconds. The flash lacks a bounce flash feature.There were some complaints that Sigma didn't put a built in flash on the DP Merrill series compact cameras.  I disagree. I really dislike built in camera flashes. I like to have full control over what flash I put on a camera, but I also want a compact flash that also enables me to bounce the flash as well.
I notice that the EF-140 DG flash is no longer mentioned on the Sigma website but can still be purchased from internet retailers so I don't know the status of this product long term--whether is it being refreshed with a new replacement or is being discontinued. But the bottom line is that the EF 140 DG flash was designed for a wide angle camera, so it should work with the DP1M, DP2M and DP3M but lacks a bounce flash feature. No word on this from Sigma yet.  I've put an information request in on the status of the EF 140 DG, so if I get an update from Sigma--I'll share that with you.
So if you are wanting a compact flash with bounce feature, 
would you brave using an old school Automatic flash with Tilt reflector?
Enter the Metz 20 C-2 compact manual flash. At $49.00 (USD) pictured below.
Sigma DP2M with Richard Franiec's add on grip and the Metz 20 C-2 flash


Sigma DP2M with Metz 20 C-2 flash. Notice the locking switch at the foot of the flash.
This flash has a guide number of 20 at iso 100/21 degree coverage ( 35mm focal length)  You have two automatic apertures to choose from if you want to use the flash automatically--F 2.8 (green) and f5.6 (red).  Here is how it works.  Attach it to your camera ( Any camera that can trigger a flash with its mount will work with this flash or any camera that has an X socket can use a cable to attach to the flash's own sync socket
 as well.  The Flash's foot has a locking switch that you lock when you attach the camera to the top of the camera flash shoe. 
Set your camera on manual exposure. Set your camera at the base flash shutter speed at 1/125th of a second or 1/200th --whatever flash setting your camera uses. (Remembering that this flash can be used on any camera) In the case of the DP Merrill series compacts, set your camera ISO at 100. Then put your aperture ( lens opening at either f2.8 or f5.6) Remember if you select F2.8, then you need to put the switch on the back of the camera to F2.8 ( Green). If you use f5.6--then put the switch on the f5.6 setting( Red)  The rest is simple.  Point the camera and shoot. This is an automatic flash but not a TTL (through the lens) flash. It uses a sensor on the front outside of the flash so be careful not to block the sensor with a large lens hood. The flash does not get its information from the camera or communicate with the camera.  It only receives the trigger from the camera's hot shoe, telling it to flash.
The external flash sensor meters the scene and figures out what the flash output should be. The newest firmware update of the DP Merrill compacts allows flash sync speeds at 1/125th sec. I've tested flash sync speeds at 1/125 and 1/200th sec and both work with the DP2M.  Of course you can use the chart on the back of the flash and set the flash manually as well based on how many feet away you and use different Iso other than two auto setting choices. 


 For novices, this may seem daunting with all these new terms--ISO, F-stop, shutter speed etc. 
So here is a quick primer:
ISO--this is the setting that makes the sensor more or less sensitive to light---a carry over from the film days when you would buy a iso 100 film for shooting in the daytime and iso 400 or higher for shooting in lower lighting conditions. 
F-stop- This is simply the size of the opening of the camera lens aperture. This is controlled by little blades that you will see change the size of the hole into the lens by opening and closing the hole. The smaller the number--the more light that is allowed into the lens to the sensor  Example-f2.8. The larger the number , the less light that is allowed to enter and hit the sensor, Example --F5.6.
Shutter speed--This is how fast the shutter opens and closes letting light in to hit the sensor. Most flash sync settings are 1/125th of a second to 1/200th of a second.  The advantage of TTL flashes that these meter through a camera's lens and the camera and the flash are communicating with each other to provide accurate scene illumination.  The Metz has you do some innitial settings, then the flash meters the scene and gives the amount of light it thinks the scene needs and then the right LED will flash red afterward briefly to confirm that you got the correct exposure.

Using the Metz flash is really very simple. Remember if you use the bounce setting---you will get underexposed photos if you don't have anything overhead to bounce the light off of.  In a house with an 8 foot high white ceiling--there should be no problem shooting with the bounce, but you may have to increase your ISO setting from 100 to 125 or 200 respectively--or change your shutter speed from 1/200th to 1/125th as well. You can always use the chart on the back of the flash and shoot manually.  Just pick the ISO you want to use, how many feet you are away from the subject and the chart will tell you what the F stop should be set at. Expect to fiddle with the controls and experiment if you are going to be bouncing the flash. It can be tilted to 30- 45- 60 or 90 degrees. The flash duration is between 1/1200 to 1/25000 of a second with a color temperature of 5500K.  It is designed for to be shot at iso 25 to iso 400. The written manual has a some nice math formulas that you can use to figure the exact setting to use the flash for more advanced features like fill lighting etc. Note: Read the manual. 

I've really never understood what all the fuss was about it being hard to use manual flashes or the older " Auto" flashes that came before TTL type flashes used proprietarily by each camera manufacturer. Surprisingly, there are quite a few of us from the film days that still know how to manually use flashes but this is a simple skill that might come in handy for novice photographers or newbies to flash photography. The nice thing about the Metz is it's simplicity with its two Auto flash Fstop settings of F2.8 and F5.6.  The addition of having the ability to bounce the light and the low cost for this pocketable flash make it a good option for use with your DP Merrill compact series cameras or any camera for that matter.  If you need a more automated through the lens TTL flash option, then the only flash available right now is the Sigma EF-140 DG flash with a slightly higher price tag and minus the bounce feature, or put a full size Sigma EF 610 Standard or DG super Flash on top of the camera for use with the DP Merrill series compact cameras.  Some of the other manufacturers make smaller TTL flashes for their respective brands, so you might have a compact solution

Do I recommend the Sigma EF-140 DG over the Metz 20 C-2 or vice versa?  No--that depends on your needs. If you don't need to bounce your flash and want a small pocketable TTL flash, then the Sigma EF-140 DG is going to work better for you but at a premium.  Want to bounce flash with a compact flash? The you might consider the Metz 20 C-2. 
I should mention there are more powerful manual flashes with manual mounts for available from Metz and also a full size one from Vivitar, both coming in around the $89 range USD as well if you want to go the auto sensor on the flash route instead of the Sigma TTL options, but these full size flashes will look mammoth on the tiny  DP Merrill series compact cameras (DP1M, DP2M or the newest offering, the DP3M).  For compact pocketable simplicity stick with the Sigma EF-140 DG compact flash or the Metz  20 c-2 compact flash.  Pick what will work best for you. The Sigma EF-140 DG being the simpler more sophisticated solution and the Metz requiring a little more user input for Auto flash mode but has the additional feature of enabling the use of bounce flash in your photography. Of course, you could own both. 
Metz 20 C-2 with bounce flash feature
Finally, how about the obligatory first Pet photos using this very interesting little flash on my DP2M direct without bounce just to give you a taste of the Metz 20 C-2?  Buddy agreed to model for me on short notice---I accidentally knocked the shutter sync speed from 1/200th to 1/160th--whoops--but when shooting raw--the files are so forgiving, so i didn't reshoot as Buddy wanted to renegotiate his modeling contract and get paid with more dog food.


F5.6 (RED) Auto mode, iso 100 at 1/160sec flash

F2.8 ( Green) Auto mode, iso 100 at 1/160th sec 

Happy Shooting!


Monday, March 4, 2013

Long Term User Report for the Sigma DP2 Merrill

A Traditional Compact Camera With A DSLR Hidden Inside.

After shooting with the Sigma DP2M for five months now, I've had the opportunity to use it in any shoot situations. I better understand the design decisions Sigma made with the DP2 Merrill series camera.  Sigma wanted a camera with a simple design, simple easy to use controls, solidly built with one of the best lens/sensor marriages ever made. The price of a high quality lens alone at this caliber would cost the price of the DP2M!  So let me be clear. The DP2M is a amazingly sharp camera but it is one thing to read about the specs of a camera and to snap a few images in order to write a review.  The  real test of a camera is to shoot with the camera over a long period of time--past the honeymoon period. Dpreview.com gets  complaints that camera reviews aren't coming out fast enough--while other sites and magazines are popping out quick reviews left and right---there is wisdom in taking more time to shoot with a camera before you write about it. You will give a more accurate assessment and opinion that benefits readers not just your bottom line with advertisers.
DP3M F8-Classic Foveon Blue Colorspace in Sigma Photo Pro Software 5.5--from raw to same size .jpg

A LITTLE HISTORY:

After the well known SD1 high price fiasco, I really had my doubts about Sigma's future as a camera manufacturer, but Sigma bounced back with the Sigma SD1M DSLR, a tribute to Dick Merrill the inventor of the foveon sensor and then astounded us by dropping this new chip into the DP1M and DP2M and married it with one of the sharpest 30mm f2.8 lens (45mm full frame camera equivalent) ever produced in a compact form that can fit into a coat pocket but here is the catch---it can produce images that rival images that are produced by cameras that cost $3300 dollars more---You'd have to purchase a Nikon D800 and put a thousand dollar lens on it to get the same results.  If you want a giggle---watch this video by Chris Niccolis  and Luminous Landscape's Nick Devlin in a Youtube video review from CameraStoreTv. Camera Store TV's Review of the Sigma DP2M vs the Nikon D800E  It is a realistic appraisal of the DP2M with some sophomoric  humor mixed in.  However---you can save thousands of dollars and buy a Sigma SD1M and put the new generation Art lens-the 35 mm f1.4 lens on it and you'll have the sharpest Normal lens/camera combination in a DSLR form for around for $2800.00 and you are still ahead of the game.  The much misaligned SD1M is a powerhouse camera and Sigma is upgrading its entire line of lenses which it will surely benefit the SD1M. Put an image stabilized lens from Sigma on it and you can handhold and shoot at much lower light levels just fine. The problem with the SD1M is that it has to compete with cameras that are packed with so many extra features and high iso performance that buyers balk at even its new lower $1899.00 price.  However with the DP2M--you get the best lens ever and the best sensor ever in a small compact package and a the street price of $799.00 USD  Now considering the high image quality possible with this camera--that is the deal of the century!
Somthing that bothers me is this grunge photography movement where you put crap plastic lenses on camera and shoot blurry, crappy images and call it art---Great!  Thats cool with me if you want to shoot like that--there is a place for everyone in this big photography universe but the thought of a crappy cheap plastic lens on a camera makes me cringe.  Why it defies the natural order of things!--- thats not my style. I like crisp focal points in my images and with nice bokeh in the background.  The DP2M can do that at f2.8. 


DP2M F2.8 impromptu photo of a friend
It is also the sharpest from corner to corner lens I've ever used.   Flash?
Yes--you can put a smaller Sigma flash on the top of it and conquer even more with your little DP2M.  Limitations?  You set the limitations of what you want to do with this camera. Want to shoot a landscape at night?  Use a tripod and longer exposure and shoot at iso 100.  If it is really super dark---use iso 200.  If I have a tripod---I will shoot in the iso 100 to 200 range for night landscapes. In a pinch--you can shoot up to iso 1600 handheld at night if you are pretty steady with your hands and you can use the Sigma photo pro software 5.5 to clean up the noise beautifully.  Sigma photopro software 5.5 produces the best monochrome images from a digital camera that I remember---it takes monochrome black and white shooting with foveon sensored cameras to the next level.
Shoot with .jpegs only?  Then buy a cheap point. I've never found a .jpeg worth using over the same raw image.  Raw images allow you to tweak out image details, shadows that will make your images stand out from the herd of photographers out there.  Just shoot on auto settings?  Buy a point and shoot. 
What are some things I think are missing on the DP2M?  5 frame bracketing-a feature found on the SD1M.  Flash sync cable port.  Shutter trigger cable.  A bigger file buffer--be prepared to wait up to 15 seconds after shooting each image--these files are huge!  You may have to buy more backup drives to store you images as well.  Call me old fashioned, but I'd love a plug in EVF viewfinder as an accessory attachment that could be purchased and of course tethered shooting. The DP2M will frustrate amateurs who are used to having everything done for them and are in a rush to get that next image.  Its not a fast camera.  It does what it does fantastically---and that is creating super sized, high resolution images with extreme image detail. Add in the recent price drop to $799.00 USD and the DP2M becomes an even better buy.  Happy Shooting!

Sunday, March 3, 2013

DP2M images shot at iso 400-6400 handheld after sunset

Yes You Can....Shoot with a DP2M over iso 100 and get good results.

Sometimes I'm astounded at the comments I read that reviewers make regarding cameras that they are testing.  A number of online camera review websites and personal photography blogs have made some very tall claims about what the Sigma DP2M can't do.  Thats a matter of perspective in my opinion.  Compared to what?  Images shot in the film days of grain?  Or are we talking about today's super high ISO shooting cameras that turn anything above iso 1600 into mush with their in camera over processing?  Let be real here.  The only reason I can ever see to shoot higher than iso 1600 is if you absolutely have to get that image and the image is not going to be printed larger than 8x10.---Event photographers, photojournalist and paparazzi all can benefit from super high iso shooting. I understand this need.  But video bloggers, professional reviewers and amateur reviewers making statements that the DP2M can't shoot decent images above iso 100 is doing a disservice to photographers who might truly benefit from shooting with this remarkable camera.  So I provide you with actual proof that you can handhold and shoot with a DP2M at higher than ISO 100---even at night.

I shot the images below right after sunset at 6:24 pm until the end of twilight which ended at 6:46pm. There was absolutely no way I could ever hand hold an image at iso 100 after sunset but I didn't have my tripod with me.  I tried--thinking that maybe I just might be able to surprise myself--but physics like heart beats have a way of getting in the way of things.  So I set the camera to iso400 F2.8 on Aperture priority and took these images, changing the iso up to iso up to 6400.  Iso 1200 is missing in series of images.

Conclusions?   Color images processed in SPP5.5 looked decent up to iso 1600. Forget about shooting color images at above iso 1600 in super low light conditions.  The sensor is just not capable of really pulling of capturing color images in dark conditions at above iso 1600 with acceptable results.  Now if you want to shoot monochrome images at iso 3200 and iso 6400---by all means.  You will get grainy looking images that remind me of Tri X film pushed to iso 1200 in the good old Black and white film days.  Interestingly enough, Sigma has added some new goodies in the newest version of Sigma Photo Pro Software ( SPP5.5) that really takes creating monochrome images with the foveon sensor seriously up a notch!  There is a banding removal tool and the ability to add film grain to the images--so if you are a film admirer like me who emulates films in his own work--its my way of seperating myself and the look of my images from the hoards of Canon and Nikon shooters out there--LOL, then you will love this new monochrome feature in the program.  In the images below---I show you how you can salvage your Iso 3200 and Iso 6400 images by making them monochrome for a dramatic affect.  I did not edit these images outside of SPP5.5 except to overlay the copyright mark using lightroom 4.0.  In this scenario I didn't add film grain to them as there is plenty grain to go around at iso 3200 and iso 6400 already.

ISO 400 F2.8
ISO 800 F2.8
ISO 800 F2.8 BW

ISO 1600 F2.8
ISO 1600 F2.8


ISO 3200 F2.8
ISO 3200 F2.8 BW

ISO 6400 F2.8


ISO 6400 F2.8

So looking at the images it makes me wonder what Sigma is thinking in providing ISO 6400, but Sigma keeps improving on the Sigma Photo Pro Software in its ability to process the raw files and Sigma continues to release firmware updates, I wouldn't rule out firmware or software improvements in the future that further improves the quality of the images in the ISO 3200 to ISO 6400 range in the post processing of raw images.  If you want to be artsy--do an images which benefits from a very grainy black and white look--then the higher ISOs will work.  Realistically with the F2.8 lens,  I found it difficult to handhold and shoot--but thanks to the new grip that I added by Richard Franiec ( See my other blog) I was able to hold the camera with more stability to squeeze out a pretty decent iso 400 shot.  Sadly, I notice in my samples that the ISO 800 sample has a little shake blurring---Sorry!  I still included it the samples so you could see how it handled overall.  So in answer to the claim that the Sigma DP2M can't shoot decent images at anything higher than iso 100? 

ABSOLUTE SILLY NONSENSE.   Now would I routinely shoot at anything about iso 400 with a DP2M?  No.  I would only shoot above  IS0 1600 if I was stuck somewhere without my high ISO performing camera.  Yes--you can own more than one camera boys and girls..... I can't imagine this one camera fits all mentality.  Its like the communist camera revolution--the collective herd mentality that I've been pointing out for years brainwashing everyone into buying into this one camera does all nonsense.  How boring that would be.  I've never subscribed to this mentality and pick the camera that I want for the job that I want to do.  I understand if you need to buy a camera that does it all and shoot well at high ISO etc.  The only one close to the DP2M in image quality is the Sony RX1--so get your wallets out and spend $2000 more dollars and be happy! But you will not find a camera/sensor combination that provides this level of image quality and sharpness across the frame this size. It doesn't exist in the USD street price range of $799.00  If you can settle for a more expensive camera with serious vinetting at the edges of the lens and blurring--then the Sony RX1 is the camera that will provide you with excellent high ISO performance--great for a photojournalist etc or someone with very deep pockets.
Now please don't complain about how grainy the images are at iso 400---I actually turned down the noise slider for luminescence as I prefer a grainy look to my images as it reminds me of film. Thats my preference. I'd rather have more detail and some grain than have this mush that is being promoted in the photography world--talking about how wonderful high ISO images are.  My opinion?  I've NEVER seen an image shot at higher than iso 3200 that was worth praise.  I would shoot images at ISO 3200 with my Canon 5D MK II for press work that were acceptable-but that is a full frame sensored camera and I was never satisfied with the results even though those images were used in magazines regardless of my low opinion of them.  Light photons don't have to pass through three layers of silicon in a bayer sensor like the foveon sensor.  One trick that Bayer sensor cameras do is shoot a black frame and remove the noise from the image that shows in the black frame. I'm a little unclear how that technology works but I believe that is one of the secrets with the Bayer sensors. With the foveon sensor you are talking about 48 megapixels of information to sort out and process into a raw file--a huge amount of information to process at one time.  I suspect in order to implement the same approach that Canon, Sony and Nikon and the rest already do in camera, that Sigma would probably have at a total of 4 true II computer chips---Like the quad core chips used  in our computers.  The full sized .tiffs from these images same size at 16 bits saved from raw (46 MB sized files in the case of iso 400) saved as huge 86MB, so all the detractors out there that are claiming that the Merrill chip is only producing a 15MP sized images are just not grasping the fact that the foveon sensor is collecting more pixel information than a comparable sized bayer sensor.  More informaton per pixel is recorded which results in huge bloated same sized files at 16 bits.  Look at these images at 100 percent.  You can see details shot with this 45mm equivalent lens in 35mm speak from 2.5 miles away in the Miami Skyline that are not visible until you look at the image at 200 percent!  My question is this--how much more detail do we need here?  The only way to improve the foveon is to increase the size of the real estate of the sensor--make it full frame.  Hopefully I'll be around when that happens because I want to try shooting with that behemoth! :) Those who constantly slam the foveon sensor with claims that it can't be handheld and shot at anything above iso 100 are full of silly nonsense.  One last thought however, if you ever want to know how I shoot the amazing night images with a foveon sensored camera?---Use a tripod and longer exposure times.
This tiny DP2M is a powerhouse camera in a compact package with one of the sharpest lenses I've ever shot with.  Whats not to like about it?  If you are willing to deal with how slow it is to process images and the limits of its useful ISO range to really no more than ISO 1600 and maybe 3200 and 6400 if you can deal with grainy black and white images--then this camera can work nicely and cover lots of stuff. One thing that so many people seem to forget about the DPM series of cameras is that you can use a flash on top of the camera too!  Sigma makes a very nice smaller flash that works very nicely with the camera so in my mind as I'm and expert in flash photographer for press work etc---I don't see too many limits with it. There are plenty of tiny manual flashes out there like the one by Metz that can be used with the DP2M as well.  Plus the new firmware update allows you to flash sync at 1/125th with all of the DP Merrill compacts as well.  In my 35mm film days I was thankful if I could push my black and white film to above iso 1200 and capture something useable and I was shooting basketball games with a manual focus camera, power winder and very fast 50mm f1.4 lens, sitting right on the sidelines! It was very exciting. Shooting with the DP2M is a cakewalk compared to what photography was years ago and best of all---the price has dropped! Meaning that I"m now seriously thinking about getting a DP1M.  Why? I'm tired of lugging heavy cameras around and don't see a problem with shooting with a compact camera that can easily produce crisp images up to 24x36 inches.  Happy Shooting my friends! 


Friday, March 1, 2013

GET A GRIP ON THE SIGMA DP1M,DP2M &DP3M!


Richard Franiec's Custom Grip for the Sigma DP1/ DP2  and DP3 Merrill Compact Cameras

( Above- the Sigma DP2M without the Grip)


When my Sigma DP2M arrived, I marveled at its compact design, but I have medium sized hands with very long fingers, so the tiny 46 MP camera feels like it is going to slip out of my hand when I'm shooting.  Holding the camera with one hand and pressing the trigger is definitely out of the question as the flat front surface of the camera is smooth and slippery even with the small raised dots on the metal.  In looking for an add on grip to address my  shooting concerns, I decided that I wanted to find a grip that met this criteria: 


1. It couldn't look like an add on grip--it must look like it is part of the camera design.
2. I didn't want a cheap plastic grip
3. It would not add substantial weight to the camera or bulk
4. It needed to be precision made and high quality so it could withstand years of use and match the existing camera    finish.
5. It needed to be reasonably priced.  

There are plenty of add on plastic grips that can be put on the DP2M, repurposed from other brands like Olympus cameras that would work and some custom screw onto the bottom of the camera grips that add considerable weight and bulk to the camera not to mention cost.

Enter Richard Franiec's custom designed DP1/ DP2 and DP3 Merrill grip.  It meets all the criteria I was looking for.  At only 35 grams, each grip is individually CNC machined from a solid block of 6061 aluminum which explains the light weight with an anodized paint which matches the color of the DP2M and looks as though it was always a part of the DP2M design which is brilliant. The grip attaches easily to the camera and can be removed later without damaging the finish of the camera in addition to being reattached using the 3M adhesive tape on the back. It does however cover the beautiful Sigma name on the DP2M and DP1M---a small sacrifice to be made for such a comfortable grip---but it does make shooting with the camera more anonymous which some photographers like. Richard in correspondence with me said that the grip is confirmed to fit the new DP3M to be released this month by Sigma as the new DP3M has the exact body as its Merrill brothers. Also to update the information from the press release posted on the new grip in November, Richard updated the sealing process from a sealing of the anodized aluminum with the use of Nickel to a hot distilled water process to address possible allergenic concerns with Nickel even though the particular process that he originally used has never been proven to cause contact allergy problems as it seals the aluminum under the anodized paint--so the user would never be exposed to nickel in the first place. The old process is used throughout the commercial and consumer products to seal aluminum and has never been proven to cause allergenic reactions--but Richard is was concerned about a perceived problem--so he decided to use a different method which is just as effective in the manufacturing process that doesn't involve nickel. 
Once I attached the DP2M custom grip to my DP2M and held it, shot a few shots with it, I knew that it  is the missing design element for the DP2M and makes shooting with the DP2M more stable and fits the shape of my hand perfectly.  


It is a beautifully designed grip. I marvel at the high tolerance fit and finish and feel of this add on grip.  It looks and feels as though it is part of the DP2M's body--not a cheap plastic or heavy, bulky screw on grip and the price is right at $36.95 USD plus $3.95 first class mail shipping cost.  I have a feeling this grip will never be coming off of my DP2M.  Stay tuned for a long term user's report and video on the new grip in the next month.